User Flow Diagrams: How to Create Them and Why You Should

Every great digital experience starts with a clear path that guides users from point A to point B (and sometimes through unexpected detours). User flow diagrams map out the journey a user takes within an interface, capturing not just the ideal route but also the potential deviations and exit points along the way.
User flow diagrams strip away visual design to focus on functionality, answering critical questions: Where do users start? What decisions do they have to make? Where might they get blocked or drop off? Whether you’re designing a checkout process, a signup sequence, or an app onboarding experience, a well-crafted user flow ensures you don’t miss crucial steps or leave users confused.
In this guide, we’ll break down how to create effective user flow diagrams, from defining key elements to avoiding common mistakes. By the end, you’ll have the tools you need to turn complex user journeys into intuitive, actionable flows without relying on guesswork.
Understanding User Flow Diagrams
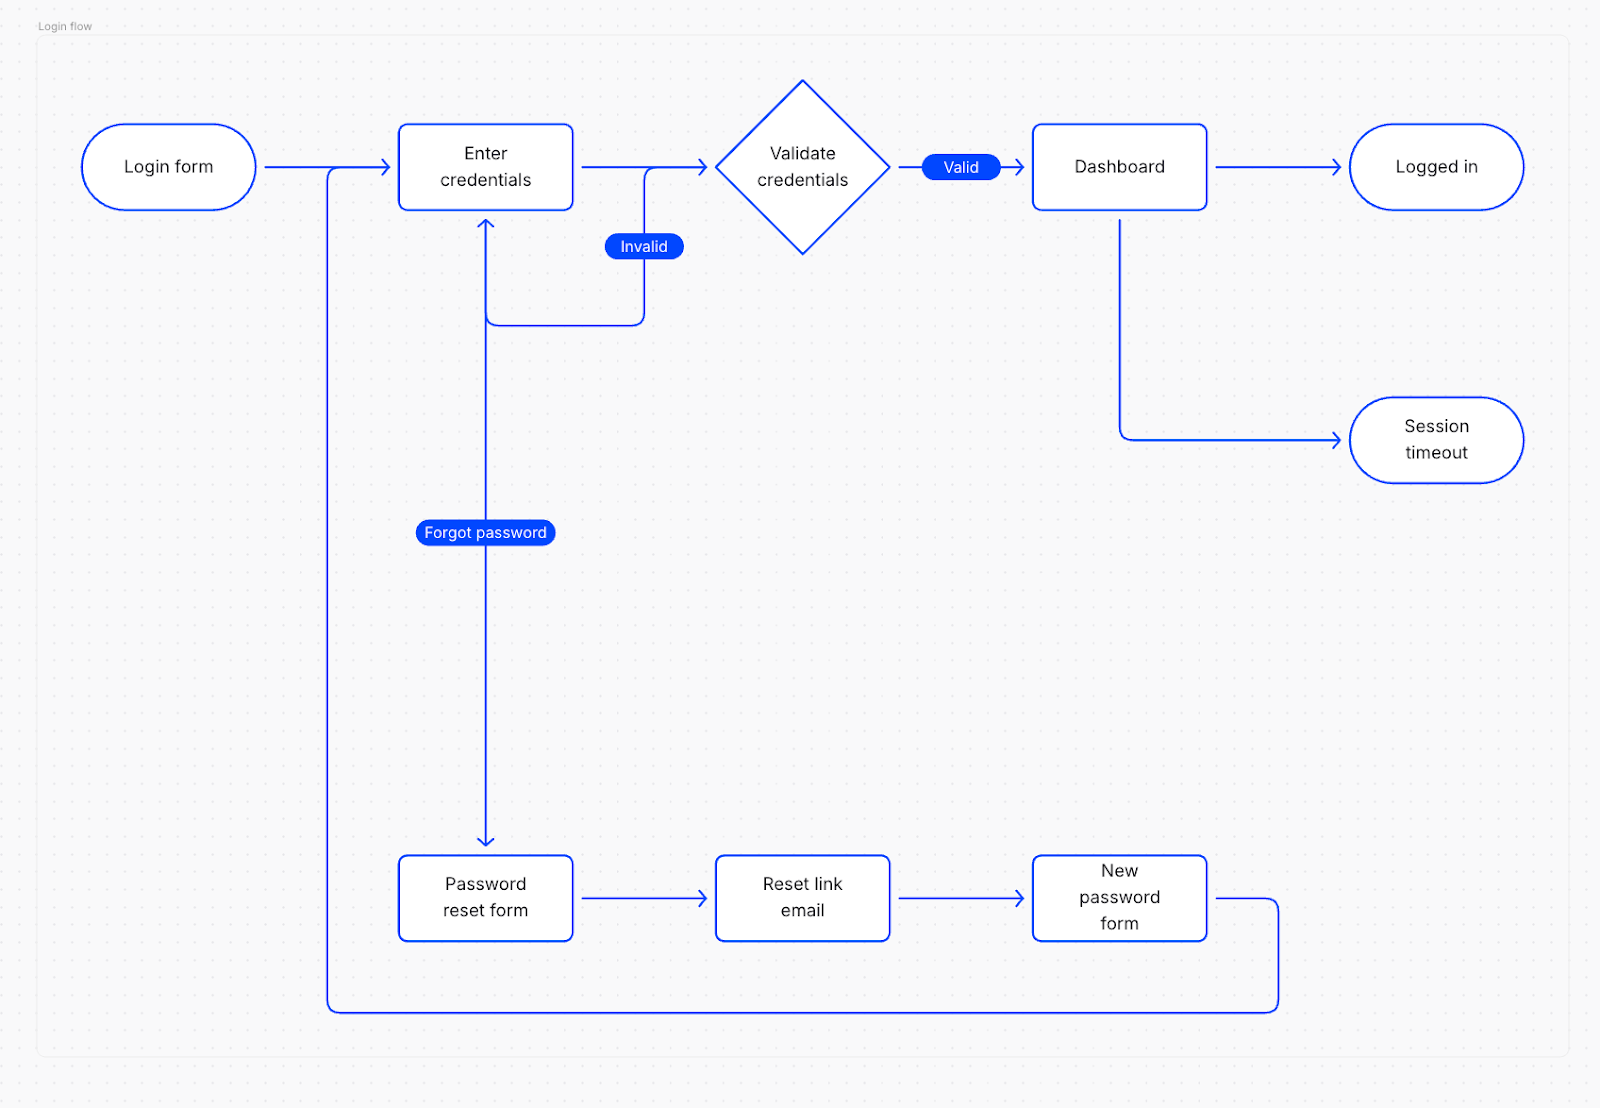
A user flow diagram is a map of the path a user takes through an interface. It includes both the ideal path and what happens if something goes wrong or the user deviates from that ideal path.
User flow diagrams are generally created in a flowchart format. They show connections between the different steps a user might take as well as where users have the ability to deviate from the ideal path.
For example, in a user flow diagram for a checkout process, the flow might start with the moment a user adds something to their cart and end when the checkout process is complete. Along the way, there might be options where the user could set up an account or checkout as a guest, where they could add additional products to their cart, or what happens if the user abandons their cart.
While they share some similarities with wireframes and sitemaps, user flow diagrams have a different focus. Where a wireframe shows what individual screens within a user flow might look like, the user flow diagram is focused on the functionality of the individual steps. A sitemap differs in that it shows every page on a website, rather than the pages in reference to specific actions a user might take.
User flow diagrams are an important part of mapping out the user experience you want for your website or app. When you know exactly what steps your users need to take to complete an action, it simplifies the process of designing each of those steps and helps ensure you don’t leave out anything important.
Key Elements of a User Flow Diagram
While the content of user flow diagrams varies based on the user path, there are certain similarities between virtually all of them. Certain elements will be found in almost every user flow diagram you create. These elements include:
Entry points

Entry points are where your users start their journey. It’s the first screen a user sees in the flow, where they make the initial decision to take action. In a signup flow, for example, the entry point could be a “sign up” button on the home page.
Steps and decision points

Every user flow diagram includes steps and decision points along the way. Each time a user must make a decision or interact with the interface, it should be indicated on the user flow diagram. A step could include entering their shipping information in a checkout flow. A decision point in the same flow could be deciding which payment type to use.
At decision points, your user flow diagram should represent the steps for each option, including where the paths might converge again. In a checkout user flow, for example, the decision point might be paying with a credit card vs. paying with Apple Pay. If they opt to use a credit card, the next steps would be to enter that information. If they opt to use Apple Pay, the user flow diagram should represent that process. Then, once they’ve completed their payment, the user flow diagram should show how the two paths converge again for the final confirmation steps to place their order.
Exit Points

Exit points show where a user leaves the user flow. While, in theory, a user could leave the flow at any point by closing the app or website, there are logical points where the user would either complete the desired action or abandon the process due to a blocker.
In a checkout flow, for example, the ideal exit point would be completing the checkout process. But there might also be an exit point where the user opts to continue shopping, or they abandon their cart. Another possible exit point could also include if there are add-on purchases shown after the initial purchase is completed, and the user opts to leave the flow instead. The user flow diagram should show what happens when those exit points are reached.
Connectors & Arrows
Connector lines between steps are an important contextual piece of information that all user flow diagrams should include. These connector lines make it clear which steps are connected and which are not. Arrows provide further contextual clues about which direction the user is moving in. While simple user flow diagrams might not need arrows to clarify those connections, more complex diagrams definitely benefit from them.
The more complex your user flow diagram, the more important connectors and arrows become to make your diagram easy to understand. Without them, you’re just presenting a series of seemingly unrelated boxes with no logic between them.
Annotations
If you’re creating a user flow diagram solely for your own use, you may be able to get away with minimal annotations. If your diagram will be shared with others, though, annotations help give insight into the thought processes and logic behind certain decisions. Annotating your diagram can show why certain choices were made, provide insights into potential pain points for users, and give general notes that you can refer back to as you move into the design process.
Step-by-Step Process for Creating a User Flow
From a technical perspective, creating a user flow diagram is no more difficult than creating any kind of flowchart. That said, there are a series of steps you can follow to make creating the diagram easier.
Step One: Define the goal
The first thing you need to do is define the goal of the user flow. What is the end state you want the user to achieve?
Step Two: Identify user personas and scenarios
Who is going to be using the flow? Why are they using it? These are important considerations, as they can drastically impact how your user flow guides users through the process. For example, a user flow aimed at technically savvy users is going to be quite different from one that targets novices.
Step Three: Map the key user tasks
What are the key steps a user has to take to complete the user flow? For example, in a user flow for a checkout process, the key steps would include entering payment information, entering shipping or other delivery information, and confirming the order.
Step Four: Sketch the flow
Sketching out the steps in the user flow can be done initially by hand or using tools like Flowstep. The idea here is to get the general steps users need to take into a more concrete user flow, while still enabling changes to be made easily. You may find that there are intermediate steps that need to be done between the key steps you mapped out in step three.
Step Five: Refine the user flow diagram
This is the step where you’ll want to use tools like Flowstep, Figma, or another flowchart app to create a higher-fidelity version of your user flow diagram. This is the version you’d share with stakeholders in the project, so you’ll want to spend a little more time on the way it’s presented.
Step Six: Share your user flow diagram with stakeholders
Once you have a high-fidelity version of your user flow diagram, you’ll want to share it with stakeholders on your project. Stakeholders may include other team members, managers or clients, and even potential end users. This allows you to gather valuable feedback that you can use to iterate and improve upon the initial flow.
Best Practices for Effective User Flows
Here are some best practices for creating effective user flow diagrams:
Keep it simple and avoid unnecessary complexity. Simple is better when it comes to user flow diagrams. You want your diagrams to be complete and comprehensive, but that doesn’t mean they need to be complicated. Pay attention to white space in your diagrams, as sufficient white space can help minimize visual complexity and clutter.
Use consistent symbols and notation. Use shapes, line colors, and symbols to add context and make your diagrams easier to understand. Just be sure to keep the symbols and other contextual clues consistent throughout the user flow diagram.
Focus on user needs, not just business goals.
When creating a use flow diagram, the business goals are obviously going to be an important aspect of how the flow works. But you have to focus on user needs just as much as business goals. The two go hand-in-hand: if a user’s needs aren’t being met, they’re likely to abandon the flow entirely, which defeats the goals of the business. When you take their needs into account first, you increase the chances that business goals will be met.
Test and refine based on real user behavior.
Once you’ve refined your user flow using internal stakeholders, it’s important to test based on real user behavior. Depending on where you are in the product development process, this could include using a prototype or functional mockup to test with users and see where there might be blocks or stumbling points in the user flow that weren’t originally anticipated.
If you’re working on a new version of an existing product, looking at user data from the original product can produce valuable insights into where users get hung up in the flow. That data can then be used to improve the user flow in the new version.
Collaborate with developers and product managers for feasibility.
Collaborating with developers and product managers is something that should be done from the beginning of your user flow diagramming process. It’s important that whatever solutions your user flow diagram presents are feasible to actually produce with the resources available. The development team and product manager can give you important insights into what they can and can’t do. And it’s much easier to design with those limitations in mind from the beginning than to have to rework the entire user flow near the end of your project.
Common Mistakes to Avoid
There are some common mistakes that can occur when creating user flow diagrams. Knowing what they are in advance can help you avoid them.
Including too many steps. It’s important for user flow diagrams to accurately reflect the steps required to complete the flow, but it’s possible to include too many steps. There are a couple of ways to avoid this. For example, if you’re creating a checkout flow, you risk starting the flow too early; don’t start at the point where someone adds a product to their cart, but rather when they click the “checkout” button. You could create a separate “add to cart” flow that includes the steps before the checkout flow. Be sure to end the flow at the correct point, too. In the checkout flow, that would be once the order is confirmed—not checking on the status of the order later.
Ignoring edge cases or error states. Users don’t always do what you want them to do. Sometimes they enter the wrong information (such as mistyping a credit card number). Sometimes they do things that aren’t ideal (like deciding halfway through the checkout process that they want to do more shopping). When creating your user flow diagram, it’s important to reflect these edge cases and error states and what happens when they occur.
Lack of alignment with actual user behavior. How do established websites or apps handle the user flow that you’re developing? How do users actually interact with those user flows? Are there established UX patterns? Look at how actual users behave within a particular kind of flow when developing your user flow diagram.
Skipping validation with real users. As a UX designer, it can be easy to lose sight of how real users behave and what they want from a website or app. Validating your user flows with real users can help find any issues before you move into the product development stage, saving time and other resources.
The Importance of User Flow Diagrams
User flow diagrams are more than just boxes and arrows—they’re the backbone of a good user experience. By mapping out each step, decision point, and potential detour, you’re not just designing a path; you’re anticipating how real users will interact with your product.
The best user flows strike a balance between simplicity and completeness. They account for both the ideal journey and the sometimes messy reality of user behavior, ensuring a positive user experience.
The next time you’re designing a checkout process, onboarding sequence, or any critical user journey, start with a user flow diagram. Test and iterate on it. Because when you get the flow right, everything else—wireframes, prototypes, and even development—falls into place faster and with fewer headaches.